CATEGORIES

blogging (3) facebook (4) windows8 (3)

Saturday 30 March 2013

How to Increase Google Adsense Revenue

                                          How to Increase Google Adsense Revenue

Tips to Maximize Google Adsense Revenue:

Your Adsense income is primarily dependent on following factors.
  1. Traffic.
  2. Cost Per Click(CPC)
  3. Click Thorough Rate(CTR).
Here we will be discussing ways to improve all the above mentioned factors so that your Adsense Income will also boost up.

Best Performing Ad Units:

When coming to Ad units size bigger is better.Larger ad units perform well compared to small ad units.
Some of the best performing ad units are 300*250,336*280,300*600,160*600.

Recently 300*600 (Half Page Ad)  was available only for Premium Adsense Publishers but now Google Adsense went ahead and made this available for all to maximise revenue.

Best Ads Placement:

Proper Ads placement is the key factor for generating high CTR.The best Ads placement from my experience are.
Top of Posts below Title:
  • This is the most preferred place to get maximum number of clicks.
  • Ad units like 300*250,336*280,468*60 and 728*90 would work like charm in this position.
Just after ending the Post:
  • From my experience this is the best place to get high CTR.
  • Place a ad unit just below the post left inclined.
  • Here is strongly suggest you to use 336*280 Ad Unit.
In Between the Posts:
  • If you are writing a lengthy posts then place text link ads or banner ads in between the posts.
  • Though placing ads manually may trouble you but can generate good CTR.

Use Maximum Number of Ad Units:

To earn more revenue from Adsense you must be using maximum number of ad units per page.Google Adsense allows only 3 Banner Ads and 3 Text Link Ads per page which is very much sufficient.
Note:Premium Adsense publishers can use upto 6 Banner Ads per page.Another way to show more than 3 ads per page is via Google Double Click.
Few Important Aspects to consider:
  • I read at many places saying that reducing the number of Ad Units can increase the CPC.But it didn't prove right from my experience. Adsense CPC is completely dependent on the source of traffic and the country location.So to generate maximum income take advantage of maximum number of Ad Units.
  • Do not place too many ads which will effect loading time and may annoy the visitors.

Include High CPC Keywords in your Articles:

Google displays ads relevant to the keywords in the article.If you include few keywords like Buy Laptops,Buy Antivirus then generally high cpc ads will be displayed.

Target US/Canada Traffic:

US,UK,Canada visitors CPC is very high.So if you can write articles targeting these nations then you can earn handsome amount from not only Google Adsense but also many other Advertising Networks.

Do not Place Ads Side By Side:

Avoid placing ads side by side especially on top and bottom of the posts.

Use Text Link Ads Below Menubar:

Text Link ads below menu bar perform well as they resemble categories of a blog.

Best Alternatives to Google Adsense 2013

                                           Best Alternatives to Google Adsense 2013

Top Best Google Adsense Alternatives:

Yahoo Bing Ads(Media.NET)-Highly Recommended:

Media.NET partnered with Yahoo and Bing and came up to form a new advertising network.This is the best alternative to Google Adsense from my point of view.I have been using this network since few days and the income is awesome. Infact my income generated from Yahoo Bing Ads is more than Google Adsense which is surprising.
  • Easy approval if you have a good site.
  • If you have many sites,more than 5 then the chance of getting approved are more.
  • You will be guided with a Sales Representative to maximize your income.
  • You wont get banned suddenly for invalid click activity or click bombing.
  • All the options available for premium publishers of Google Adsense are available for all Publishers as Media.NET treats everyone as their premium publisher.
  • Infact its better than Google Adsense if you have a micro-niche site because their ads can be targeted to specific keywords which will show very relevant ads to maximize the income potential of your blog or website.

BuySellAds:

This ad network has grown tremendously in the past some time and that's why shines at the top in this list of Google Adsense alternatives. The concept of this rapidly growing ad network is totally different from Adsense. It can be called as marketplace to sell/buy ad spaces. As a blogger, you are required to apply for BuySellAds account. Once you get approved, you list the ad spaces of your blog at decent rate. Advertisers purchase the ad spaces and you get paid. The best thing is that your earning get fixed in this and there is not any heart attack of getting banned by them. Moreover, you set the ad space price, from your own.
  • Its not that easy to get approved for BSA.
  • Your site must have atleast 50,000 impressions per month.
  • No illegal, or containing even remotely *questionable* content.
  • Minimum payout is $50.

Tribal Fusion:

Tribal Fusion is a CPM based ad network.Its one of the best google adsense alternative but its not that easy to become Tribal Fusion publisher.
  • Your site must be getting atleast 500,000 monthly impressions to become Tribal Fusion publisher.

Exit Junction:

This is a new network to monetize your website with exit traffic.When a visitor leaves your website it will show a pop-up with and ad.When visitor click on the ad you will get paid.This is a new innovative advertising method.Works well if your site has good traffic.

Adversal:

Adversal is also one of the best google adsense alternative.Basically its a pop up based ad network.You will get paid for every visitor.So it has a great potential to make money if your site has good traffic.

Chitika:

Chitika is well-renowned ad network that competes with Google Adsense. Like Adsense, it also pays when someone clicks on the ads getting display on your blog. The cost per click may not be so good for traffic coming from the parts other than U.S. and U.K. But if you have traffic from these locations, then you can make hell lot money from Chitika. You can refer your friends and can earn the commission. Minimum payout is $10 via PayPal, while $50 via cheque.

Infolinks:

Infolinks is in-text advertising network. Means, when you use Infolinks on your blog, it converts the normal text into clickable ads. The best part about the Infolinks is that getting approved into their network is damn simple and you can start running the in-text ads on your blog, as soon as you apply for it. The cost per click is not that much as you get in Google Adsense, but as the mode of advertising is totally different, so there is always a higher CTR in Infolinks as compared to that of Adsense. Some bloggers even tag this ad network as the best alternative to Google Adsense. While the ad network is very popular, but some SEO experts claim that using the Infolinks may kill your visibility in the search engines as in Infolinks, your normal text, including your targeted keywords gets converted into clickable links. This may make a spam-type image of your blog in Google's eyes. The Minimum payout is $50 via PayPal, while $300 via Bank Wire Transfer.

Kontera:

Kontera is also in-text advertising network that converts the normal text into ads. When someone clicks on them, you get paid. Your blog must have good page impressions to get approved into the system. It does compete strongly with both of Google Adsense and Infolinks. You can withdraw the money, once it touches $50 mark.

Adbrite:

Adbrite has always been considered as one of the best Adsense alternatives. Once you get approved into system, Adbrite puts a banner on your blog, showing the sale of that particular ad slot. Getting approved into the network is very easy, but your success in Adbrite solely depends on your blog's popularity. If it s quite popular, then advertisers contact you to buy ad space. The price for the ad space is set up by you. When any advertiser shows his/her interest in displaying ads on your blog, it is completely up to you that you want to accept the ads or not. You can sell the ad space on weekly, monthly basis. The minimum payout is $100 via PayPal.

Clicksor:

They approve any blog, if it is totally new. Clicksor offers all type of advertising like In-Text, Contextual. The pop-up ads are also part of Clicksor. Though this ad network is good challenge to Google's Adsense, but sometimes it shows irrelevant ads, mostly the adult ads. You can withdraw your earned money to your PayPal account, once it touches $50 count.

Bidvertiser:

This ad network offers contextual and feed advertisements. Though you earn good money for each click that you get on your ad, the extra amount is paid to you, if your ad results in a successful conversation. The minimum payout is $10, and one can get this money in one's PayPal account.

So give them a try and share your experience with us.If we missed out any let us know in your comments.
Author Bio: I Sai Kumar a Founder and CEO of Crunchyhub. I am a 21 Year Ordinary and a Simple guy from Hyderabad, Andhra Pradesh. I write about Blogging, Technology, Programming, Social Media, and Make Money Online etc

Yahoo Bing Ads (Media.NET) Review - Ultimate Alternative to Google Adsense

                 Yahoo Bing Ads (Media.NET) Review - Ultimate Alternative to Google Adsense 

What is Yahoo Bing Ads?

Yahoo ,Bing in collaboration with Media.NET came with a new advertising solution for Publishers and Advertisers.Its a new Advertising platform to drive targeted traffic for Advertisers and earn money by publishing ads for Publishers.

Customer Support:

They have excellent customer support.Each publisher will be assigned a Sales Representative to guide you throughout the process.They will be guiding you regarding best Ads Placement,Ads Type to maximise revenue from their network.

Targeted Ads:

The Ads displayed by Media.NET are very relevant and will be shown relevant to the content.One more option they offer is targeted ads.If you have any specific posts on your blog with high traffic then you can list out those keywords as keywords hints to your sales representative .So that they will be targeting those keywords to maximize the CTR.
  • Sales representative will be guiding you throughout the process and they will inform you if there are any violations or anything out of their quality guidelines.
  • So no sudden ban to your account as in the case of Google Adsense where all your income and hardwork may get spoiled with that one mail stating "Adsense Account has been disabled".

Different and Attractive Ad Units:

One more best feature of Media.net is you have full control over customising your ad units with different colours to match with your blog design and colour.This is also an other great feature which is absent in Google Adsense.
  • They also offer ad units of various sizes like 300*250,300*600,600*250 etc.

Earning Reports:

Basically Yahoo Bing Ads(Media.net) are CPM based ads and they pay you on the basis of thousand impressions.
  • CPM may vary anywhere between $0.5-$2 which is pretty much decent and almost similar to Google Adsense.
  • Below is the screen shot of my income generated from Media.NET.
yahoo+bing+ads+earning+reports
Yahoo bing ads earning reports

Payout Methods:

They offer two payout options Wire Transfer and Paypal.Paypal is my favourite mode of payment as we need not wait for the old postman for check which is very annoying.
  • The minimum payout threshold limit is $100 which is very much reasonable and you will reach the limit in no time if you have a pretty decent traffic.
  • I have been using since 20 days and my earning already crossed $100 with only two Ad Units.
yahoo+bing+ads+earning+proof

Approval Process:

Yahoo Bing Ads approval process a little different while compared with other advertising networks.They are accepting only limited Publishers with decent traffic from US/UK and Canada.
  • It may take upto 2 weeks to review application to approve /disapprove .So be patient till you get an acceptance or rejection mail.
  • You can submit upto 5 Blogs/Websites for review.So more the number of blogs you submit more will the chance of approval.
  • I will soon write a separate article on how to get approved for Yahoo Bing Ads quickly.

Conclusion:

No doubt Yahoo Bing Ads powered by Media.Met is ultimate alternative to google adsense and its going to be a tough competition between two giant networks.For those who are hurt by the cruelty of Google Adsense can move ahead with Yahoo Bing Ads.

Rearm Windows 8 Enterprise Evaluation to Extend 90 Days Trial for Free

                          Rearm Windows 8 Enterprise Evaluation to Extend 90 Days Trial for Free

Microsoft has officially released evaluation edition for free for 90 days.It comes with all the features of Windows 8 Pro Edition.In this post we will discuss how to extend 90 days trial of Windows 8 pro and use it for 90 more days.So in total 90+90=180 Days.

If you don't know Rearm is a inbuilt feature of windows 8 which will extend the trial period of all editions of Windows 8.This methods isn’t anything cracking or illegal method to activate Windows 8.If you want to continue trial version for some more days, re-arm Windows 8 Evaluation version.

How to Extend Windows 8 90 Days Trial: 

  • If you have not yet downloaded windows 8 edition then you can Download Windows 8 PRO Edition for Free from here.
  • Once you download the Enterprise Edition and install it on your PC you can use it for trial for 90 days for free.
  • A watermark will be visible on the bottom right corner of the desktop background showing the number of days remaining for activation.
  • Once the trial period is over you will be demanded to buy windows 8 pro edition.If you don't want to buy and use it for trial for some more days then follow the below steps.
  • Once the trial period is over you need to re-arm your windows 8 edition to extend the trial.This feature was available for windows 7 and Microsoft office as well.

Follow below steps to Re-arm Windows 8 Edition:

  • Once you notice the trial period is over or about to complete you need to re-arm to use it for 90 more days for free.
  • First open Command Prompt(CMD).The most important thing to execute this operation is to Run command prompt as Administrator.
  • Once command prompt pops out run the following command.
Run this command:  slmgr /rearm
  • As soon as you run the command you will get a pop up notification to restart your PC.
  • Once you restart your PC it will set to 90 days trial again.
It is recommended to run this command on the 89th day so that you will get more 90 days from that day.
Few more Commands: 
There are few more commands to check the activation details of your windows Operating system.
To check the current license information of Windows 8:    slmgr /dli
To check the detailed information of the current license type:  slmgr /dlv
To check the expiration date of the current license:  slmgr /xpr

Complete Windows 8 Guide

                                           Complete Windows 8 Guide

Windows 8 has proved that its better than its predecessors windows 7 XP and Vista.In this article we will list out all the Tutorials and How to Guides related to Windows 8 Operating System.

Downloading Windows 8:

Microsoft first released the preview editions of windows 8 then finally released the Professional Edition on August 1st 2012.Since its release it has got a great hype.

Installation:

You can install windows 8 on your computer in different ways based on your need and convenience.
  • Install Windows 8 on virtual box to test its features.
  • You can mount ISO image of downloaded windows 8 edition and format your PC with usual bootable CD method.
  • In case if you dont want to go ahead with Bootable CD method then you can also install windows 8 via usb/pendrive.
  • You can also run Windows 8 in parallel to the existing OS on your PC.All you have to do is to format your PC using the same traditional bootable method but here you have to choose a different hard drive i.e Other than C Drive which is already loaded with the existing Operating system.So you have to choose drive other than C while formatting your personal computer.

Windows 8 Activation and Keys:

Almost all the editions of windows 8 comes with trial period.Windows 8 pro edition comes with a 90 days trial.

Read more: http://www.alltechbuzz.net/#ixzz2P0aIyKjO


How to Add a Shutdown,Reboot Buttons to Windows 8 Start Screen

                         How to Add a Shutdown,Reboot Buttons to Windows 8 Start Screen  

Windows 8, the latest operating stem from Microsoft has tried to unify the experience from Tablets to laptops and to desktops. This Operating system is way more touch friendly than its predecessors and has with its sleek approach to simplify all the day to day tasks.

adding-shutdown-shortcut-in-windows-8
However, there is one point where this Operating System didn't performed as per the expectations of the users. And that point is the ease with which one can Shutdown or restart the system. In earlier versions of Windows, user just need to click on the Start button and select the Shutdown option to shutdown the system. However that is not the case with Windows 8 as Windows 8 does not feature any Start button. In fact the Start button has been replaced by the Start screen. So, to Shutdown the system, one has to Go to the Power option under the Settings charm and then select the Shutdown option. Lengthy, isn't it?

So, today we are here with a tutorial following which you can add a Shutdown and Reboot tile to your Windows 8 Start Screen so that the whole process becomes simple and you get to shutdown or restart your system just with one click. So lets get started.

Check out the video tutorial on adding Shutdown and Reboot buttons to Windows 8 Start Screen:

Follow the steps to Add Shutdown and Restart Buttons:

(1) First of all launch Notepad. This can be done by pressing Win Key+R which will call up the run dialogue box and then type notepad and hit enter. Or you can even search for notepad from the start screen and then launch it.

(2) Then copy and paste the below given text to notepad.
set WshShell = WScript.CreateObject("WScript.Shell")
strStartMenu = WshShell.SpecialFolders("StartMenu")
set oShellLink = WshShell.CreateShortcut(strStartMenu & "\Shutdown.lnk")
oShellLink.TargetPath = "%systemroot%\System32\shutdown.exe"
oShellLink.Arguments = "-s -t 0"
oShellLink.WindowStyle = 1
oShellLink.IconLocation = "%systemroot%\System32\shell32.dll,27"
oShellLink.Description = "Shutdown Computer (Power Off)"
oShellLink.WorkingDirectory = "%systemroot%\System32\"
oShellLink.Save
Set oShellLink = Nothing
set oShellLink = WshShell.CreateShortcut(strStartMenu & "\Log Off.lnk")
oShellLink.TargetPath = "%systemroot%\System32\shutdown.exe"
oShellLink.Arguments = "-l"
oShellLink.WindowStyle = 1
oShellLink.IconLocation = "%systemroot%\System32\shell32.dll,44"
oShellLink.Description = "Log Off (Switch User)"
oShellLink.WorkingDirectory = "%systemroot%\System32\"
oShellLink.Save
Set oShellLink = Nothing
set oShellLink = WshShell.CreateShortcut(strStartMenu & "\Restart.lnk")
oShellLink.TargetPath = "%systemroot%\System32\shutdown.exe"
oShellLink.Arguments = "-r -t 0"
oShellLink.WindowStyle = 1
oShellLink.IconLocation = "%systemroot%\System32\shell32.dll,176"
oShellLink.Description = "Restart Computer (Reboot)"
oShellLink.WorkingDirectory = "%systemroot%\System32\"
oShellLink.Save
Set oShellLink = Nothing
Wscript.Echo "Created Shutdown, Restart and Log Off buttons"
(3) Now click on the Save As option in the File menu and in the File name enter Shutdown.vbs Don't forget to enter .vbs

(4) Next in the file type, select All files and click on the Save option.

(5) Then switch to the location where you saved the file and run the file once. The file will open for a second and then will automatically disappear.

(6) Now switch to the Start Screen and Voilla. You will see that the Tiles of Shutdown, Restart and Log Off have been automatically pinned there and now with one click you can Shutdown or restart your system.

What is Facebook Graph Search ?

                                       What is Facebook Graph Search ?

Facebook Graph search can be described as the modified or advanced search on Facebook to explore things in detail. With this graph search you can search for many things which your friends like, places people explored etc.

Few Examples:
If you want to know about the list of your friends (or friends of friends) who likes to cry, you can just simply type “friends who like crying” and in real time Facebook will show you the list of people who likes crying. With this you can explore new people who are with same interest of yours.
You can even filter your search results to a particular place, by typing “People who like crying in Washington” you can get the whole list of them.  Sounds pretty interesting Isn’t it?

How to get Facebook Graph search to your Facebook profile:

Facebook launched this feature just for few limited people and this is now available to everyone.
When I checked it, this feature is even disabled for me, which means enough number of people is already trying this. Keep checking that page to join the waiting list.

Facebook Layout with Facebook graph search:

This is how the Facebook layout of an account looks like when Graph search is enabled on a profile
facebook+graph+search+enabled+for+a+profile
Friends requests, Messages and notifications icons which are normally at the left top of our Facebook profile. But when Facebook graph search is enabled on your profile they get shifted to the right top just besides the profile button. At the place where we used to see the normal search box, we can see Facebook new Graph search coming into action.

Difference between Google search and Facebook Graph search:

Though we can get any sort of search results accurately using Google, we can’t get the search results that can be provided by Facebook..! Let me tell why. . If you search for people who likes playing cricket on Google it will show you some results, and if some other person did a search on Google for the same thing it shows the same results. No matter who you are Google will just show the same results for you every time. But in the case of Facebook each and everyone will get separate results depending upon the interests of their friends. This makes the things even better. You can even search for places which your friends visited, Places which your friends recently visited. etc.

Conclusion:

When Facebook introduced Timeline features to its users many people searched desperate to remove it from their profile as many didn’t felt comfortable with that new layout of profile. But later people get went with it without any regret and now everyone is addicted to it. But as soon as Facebook introduced this Graph search, people started responding in a quite positive manner towards it. I am pretty sure that this will make the Facebook even better.


How to Give Maximum Protection to your Facebook Account

 How to Give Maximum Protection to your Facebook Account

          Why Hackers try to hack your Facebook Account?
  • To Steal Information:The main motto behind hacking your account can be stealing information.As Facebook is a place where you interact with every person and discuss various issues like personal matters,business deals,Education etc.So some one might wanted to know your secrets about your Personal/Professional life will try to hack your account or hire any expert to hack your account.
  • To ruin your Business:For few people Facebook is not just a social networking site but its a great platform for many people to expand their business and get wide popularity in just few days.Even for a blogger like me,my Facebook account is very precious for me as it is one of the major traffic source for my blog and also my Facebook Fanpage which has about 2000 Followers.If such an account gets compromised then I will be loosing Facebook Fanpages and many other groups linked with that account.
Also Read:How To Get Mor Likes For a Facebook Fanpage/Increase Facebook Likes.
  • For Money: As I already said that your Facebook account is not just an account but its linked with your Personal/Professional life.Some people might sell/hack your account to earn money.
  • Just For Fun: Now this sounds weird but its true.Few hackers just hack Facebook accounts randomly for fun.Having passion to become a hacker is not a bad thing but using your skills in a wrong way may take such people into danger.
  • Even though there are hundred other reasons why your Facebook can be hacked,the above stated are just few common reasons why most of the accounts gets compromised.

Does Facebook give Good Security to its users?

The answer is Yes.Facebook is very much concerned about its security of its users.Though the privacy is not that good on Facebook but security measures are very high.Its highly difficult to compromise a Facebook account unless and until the Facebook user ignores few security measures and falls into trap of the hacker.

Steps to Protect Your Facebook Account:

1.Keep a Strong Password:

This is the first thing every user must take care of.
Its very unfortunate to inform you that most of the passwords are either password/phone numbers/nick names/Date of births.
This makes your account very weak and it will be very easy to compromise your account by guessing your password if the other person knows you personally or just few details of yours.
A strong password must contain atleast 8 digits with Small Letters (a,b,c etc), CAPS(A,D,E),Numbers(5,43) and special characters(_,@,$).

2.Setup Very Strong Security Question: 

80% of the accounts are hacked by answering security question.Most of the people ignore and become lazy while setting up their security question and for the name sake they keep some nickname/Native places as their security question.A person knowing a little information about you can easily compromise your account by answering security question.
  • If you have not yet setted security question to your Facebook Account ,Go to Account Settings->Security Tab there you can see the option setting up security question.
  • If you have already setted up security question for your account then this option will not be visible to you.
  • Facebook doesn't allow you to change your Security Question for security reasons.

3.Turn On Secure Browsing:

Always browser on secure https.The green https in your browser url denotes secure browsing where as yellow/red mark on https denotes insecure browsing.
Secure+https

Steps to Turn on Secure Browsing:

1.Go to Account Settings.
Facebook+Account+Setting
2.Then on the left side click on Security Tab.
3.In Security click on Secure Browsing and check the Box "Browse Facebook on a secure connection (https) when possible" then save the changes.

Enable+Secure+Browsing

4.Turn On Login Notifications:

By turning on login notification you will get a message to your email/phone whenever you login from a new device.Facebook mobile service is very poor and you rarely get any message from them to mobile but their email notifications service is pretty good and fast.
  • Go to Login Notifications and Check both boxes then save the changes.
Login+Notifications

5.Set a different Password for Applications:

We daily use many applications on Facebook.Most of them wont ask you for password but rarely you will find few applications that asks your password to access the application.Most of the times such kind of applications will turn out to be phishing scams.So Facebook has taken an advanced step and gave users an option to set a different password for applications.
  • To set A Temporary password for applications go to App Password and click on generate.
App+Password

6.Keep the account which is linked to Facebook Safe:

Your Facebook account may either linked to Gmail,Yahoo,Hotmail etc.In order to protect your Facebook account you must give good protection to your linked accounts.

7.Maintain Separate Public and Private Email Addresses:

As I already said that you must keep your linked account safe in order to keep your Facebook account safe.So better keep the email id linked to Facebook as private and dont share with others.

8.Hide your Primary Email ID from Other:

1.Go to your Account Info.
2.In Contact Info Section click on Edit button.
3.Now if you are asked to enter your password enter your password and submit.
4.Then you can set the preference as you like to your primary email address.
5.Choose only me if you want to hide it from others.
Hiding+Primary+Email+ID

9.Keep a Glance at Recognised Devices:

Facebook asks you for device name whenever you login from a new device.Facebook stores the names of all these devices in your Recognised Devices section.If anytime you see any suspicious device click on remove.
Recognized+Devices

10.Do not fall for Scams:

Facebook is the #1 target for scammers.They try to scam each and every possible way to trap you to hack your account and to earn money.
Most of the common scams you see on Facebook looks like Removing Facebook Timeline,Check out who viewed your profile most.
Timeline+Removal+Scam

After timeline has introduced and once you enabled it then its not possible to remove timeline.Also there is no such application which helps you to know who viewed your profile most,Facebook doesn't allow this.Such things are very eye catching and most of the people want to know such things so they give a try and fall in trap.Such kind of things are the primary targets for scammers ,Beware of such things.

Conclusion:Learn Few things about Hacking:

The last but very important is knowing few things about hacking.I am not forcing you to learn hacking but you must know few common attacks by which your account can be compromised.The most widely used attacks are Phishing,Keylogging.Know a little about these things to stay away from such attacks.

How To Remove Facebook Timeline Easily

                                              How To Remove Facebook Timeline Easily 
 
Facebook recently launched new feature called Facebook Timeline.Some facebookies like Timeline and some hate it but there was no response from facebook on How To Remove Facebook Timeline for those who didn't like this feature.

Still not using Facebook Timeline then get from the below link:

Update On Removing Facebook Timeline Easily:

Now you can easily Remove Facebook Timeline using this service called Timeline Remove for Google Chrome,Mozilla Firefox,Safari and Internet Explorer.
  • Go to Timeline Remove.
  • Scroll Down and select your browser.
  • Download and Install the extension for your Browser.
  • Then just restart the browser,your Facebook Timeline will be disappeared.

Other Ways To Remove Facebook Timeline:

Mozilla Firefox Users:

Step 1:Go to this [link] and install User Agent Switcher Addon then restart your Browser.
Step 2:Open Firefox, Press the Alt Key > Open Tools > Default User Agent > Internet Explorer and choose Internet Explorer 7.
Firefox+user+agent
Step 3:Open your facebook and refresh your profile page(Ctrl+F5).Thats it now you will get your old profile back with some errors like extra spaces,formatting etc.To remove those errors install this addon for firefox[link]

Google Chrome Users: Update:Follow the below link to Remove Facebook Timeline for google chrome:

Step 1:Right click on Chrome.exe Icon and go to Properties.
Step 2: Make sure you are in the ‘Shortcut’ Tab.
Step 3: Paste the following code in the Target window after the : “C:\Program Files\Google\Chrome\Application\chrome.exe”
CODE – For Windows Vista & Windows 7 Users.
–user-agent=”Mozilla/4.0 (compatible; MSIE 7.0; Windows NT 6.0)”
CODE – For Windows XP Users.
–user-agent=”Mozilla/4.0 (compatible; MSIE 7.0; Windows NT 5.1)”
Note: Leave space between
“C:\Program Files\Google\Chrome\Application\chrome.exe”<SPACE>–user-agent=”Mozilla/4.0 (compatible; MSIE 7.0; Windows NT 6.0)”
How+to+deactivate+facebook+timeline
Step 4:Open your facebook and refresh your profile page(Ctrl+F5).Thats it now you will get your old profile back with some errors like extra spaces,formatting etc.To remove those errors install this addon for firefox[link]

Update:Follow the below link to Remove Facebook Timeline for google chrome:

Safari Users:

Step 1:Open Safari Browser, go to the Preferences menu > Advanced > Tick the “Show Develop menu in menu bar” option.
Step 2: Click the page icon menu (next to the Gear icon near Search Bar) then select the Develop/user agent menu, Choose the User Agent as Internet Explorer 7.
Step 3:Open your facebook and refresh your profile page(Ctrl+F5).Thats it now you will get your old profile back with some errors like extra spaces,formatting etc.To remove those errors install this addon for firefox[link]

Internet Explorer:

Our Tweak is to set all the user agents to Internet Explorer 7.So if you are using Internet Explorer 7 then by default you don't get facebook timeline.If you are using updated version then follow the below settings.
Step 1: Open Your Facebook Profile Page.
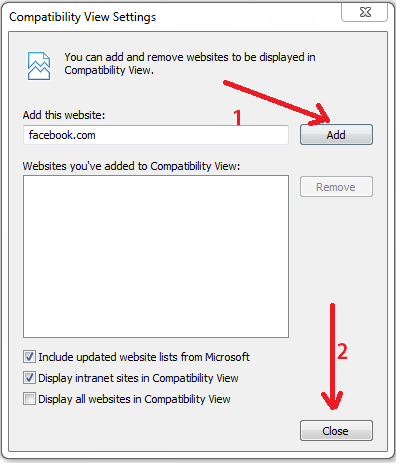
Step 2: Press Alt Key. Click on Tools > Compatibility View Settings.
Step 3: If facebook.com is already filled in, Click on Add else fill in facebook.com and Click on Add followed by Close.
Interent+Explorer+Compatibility+View+Settings
Step 4:You are done just refresh the page.

So friends I hope you are able to Remove Facebook Timeline.If you have any trouble then please leave your comment.Those who have successfully Removed Facebook Timeline Share your experience.
Note:There is no response from facebook on disabling timeline feature so here we are going to perform a Browser Tweak to disable timeline that will get you back the old facebook view.This will appear only to you and other will be able to see your Timeline Profile.

Best Facebook Tricks You Might Not Know 2013

1.Watch Streaming TV Live on Facebook:

There is a Facebook Application that provides free streaming live TV channels on Facebook.You can watch a lot of International Channels using this Application.I am able to watch live channels without buffering on my 2G connection.This application is totally at free of cost.2012 Olympics are also broadcasted on this channel.
Application Used:http://apps.facebook.com/tvdream-app/

2.Send SMS from Facebook:

Yes you are right now you can send sms from facebook.There are no country restrictions.You can send sms to any country.The message sending is instant and takes only few seconds to reach the destination.All this is possible with a cool facebook application.
Send+sms+from+facebook
  • Select your country.
  • Then in the next line enter the mobile number to which you want to send sms.
  • After that enter your message that you want to deliver.
Limitations:
  • You can send only sms upto 100 characters long.
  • You can only send 4 SMS per day.
  • Dont do any illegal things with this service as it will first display your name at the beginning of the message.

3.Create a Video With Your Pictures on Facebook:

You can easily create a video with your Facebook Pictures.To create a video with your facebook photos go to pixable.com[click here].

4.Delete Facebook Account Permanently:

Most of them are confused between deleting and deactiving their Facebook Account.Deactivationg is completely different from deleting your account permanently.To avoid confusion just follow the below link to delete your facebook account permanently.

5.Trick to download facebook Photo Album-Link:

Follow this link to know how to download facebook photo album in  a single click.

6.Trick to see who is online when you are offline:

Sometimes it becomes necessary to check who is online which being offline.At such times there is a very cool Facebook Application which can make your job easy.Use the below application to know who are online while you are offline.

7.Trick to publish empty status:

Login to your facebook account.Then click on update status and enter the following code and hit enter.
@[2:2: ]

8.How to find who deleted/Unfriended you on facebook?

You can find who deleted or unfriended you on facebook using an application called who delete me[click here].
This application will back up all your friends list when you sign up for the first time and notifies via mail whenever there is a change in your friends list.

9.Download Videos From Facebook For Free:

To download videos from facebook go to Downfacebook.com[click here]
There put the Facebook Url of video and your video will be ready to download.

10.Place Facebook Chat on Firefox Sidebar:

Place+chat+box+in+mozilla+sidebar
  • Open Mozilla Firefox browser and press Alt key.
  • Select bookmarks and select "show all bookmarks"
  • A box will open from that select unsorted bookmarks > organise >  new bookmark.
  • Again a box will open in that type "facebookchat" in first boxand type "  http://www.facebook.com/presence/popout.php " in second box .
  • Click on load this bookmark >add.
  • Now again press alt key > view > side bar > bookmarks>.
  • Then select facebook chat from the bookmarks in slide bar.
  • You are done.Now you will be able to see chat bar on the left side of your Mozilla Firefox Browser.

11.Post your Status in All Facebook Groups in a Single Click:

Some times you want to post your status or write message in all groups.If you do the job manually then its a time consuming frustrating process and you end up in posting your status only in few groups.But now your job has become very easy.There is a facebook application using which you can post your Facebook status in any number of groups you wish.
Using Multiple Post Application you can make your job easy to post your status in multiple groups.

12.Tips and Tricks to get more likes for your Facebook Fanpage:

Now a days almost most of the Facebook users have some Facebook pages.May be it is Music,Dance , Actor,Brand Page,whatever page it may be all you need is to get more likes for that fanpage.I listed few Tips and Tricks using which you can get more likes for your fanpage just follow the below link.
You might have known that you can add smileys and emotions in your Facebook Chat Box.Not only smileys but also you can add any picture in your facebook chat box.
Chat tricks will enhance your ability of using facebook and with these tricks you can easily impress your friends while chatting.
I already posted few Status tricks.This is a very cool trick using which you can update your facebook status via Blackberry,Iphone,Android,Ipad etc using Facebook Applications.
There are many such applications, I mentioned few best applications. Follow them and update your status.
status+update+via+blackberry

Read more: http://www.alltechbuzz.net/#ixzz2P0SedMPI